Grunt - Colour Theory
I'll be treating the suit as if it were the vertical fuselage of a german plane ... the rear will be RLM 76, the front will be a soft edge 74/75 pattern. There may be a little mottling along the sides to blend it all together. May also go for RLM 21 ID bands ... but not sure yet.
Markings are inspired by this very standard aircraft ...
Grunt - 1/20 Nitto Gustav
Needed a break from working on a Nitto Krote (longest build of my model making life - and still a ways to go ) ... so I built this Gustav in just over a day because I really wanted to paint something. Built largely stock for speed (swapped out the arm joints for solder and putty, sculpted over the kit's leg joints, replaced the laser barrel with a Wave option part, fixed the crappy Nitto hand, added some weld beads and modified the hips so I can pull the legs out to paint separately), the interior and seat were painted prior to construction. The idea is for this suit to represent a regular ground slogger ... an SDR Grunt, so I'm going with a fairly 'low key' marking combination over a RLM 74/75/76 camo scheme.
The Little Mermaid
This is a repaint of a 1/35 Hobby Base Melusine. I stripped the pre-painted figure with acetone, sanded back the seams and imperfections then repainted the model with Tamiya enamels. I also added an aerial and rear guard bracket with wire. A mix of 1/76 aircraft decals and the new Hasegawa decals from the 1/35 Gustav set were applied. The finished camo represents a suit from 'Panzerkampf Division 44, 22nd Kommando Kampanie'. The crushed cinderblocks were scratchbuilt from heavy card stock, textured and blended into the base with real dirt and gel medium. Base is a GW 40mm round which is the perfect size for 1/35 suits IMO.
Balls Out - Base 2
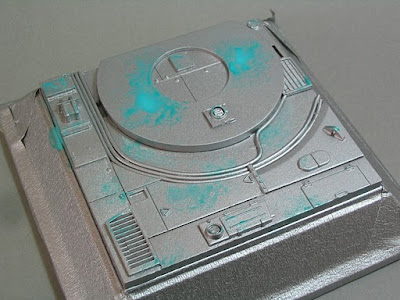
I base coated the display with silver automotive spray then stippled on some masking fluid ...
Then I sprayed on some white primer. When the primer had dried I scrubbed off the masking fluid with a toothbrush ...
To soften the contrast I'm slowly starting to work some off-white filters into the base.
The look I'm going for is inspired somewhat by the interiors of the Nostromo
Balls Out - Base 1
Desert Poacher - Groundwork and Decals
Basic paint work is done, and groundwork has been completed. Groundwork is just dirt, rocks and matte gel medium. I don't like painting groundwork so over the years I've collected bags of different colored dirt to mix with gel medium to create a variety of environments - for this desert scene I used dusty shale from under a rail bridge. The grass is a product from Germany called 'miniNatur' ... it comes in a range of different colors and scales - these are 2mm autumn tufts (I gave them a bath in Tamiya flat earth then dusted them with the same fine dust I used on the base).
Decals were cut, line by line, from the Wave AFS decal sheet ... the unit marking was featured in the Hobby Japan special edition as the insignia of the 102nd independent armored hunting regiment.
Desert Poacher - Construction
Subscribe to:
Posts (Atom)